


This chapter assumes that you are experienced with the general features of the browser, and that you want to learn how to use the browser's RAD capabilities. See "Browsing Source Code" on page 205 for more information about activating and configuring the browser for your project.
The topics in this chapter include:
The tab control displays one view at a time. Click a tab name to display its associated view. For example, click the Java tab in Figure 15.1 to display the Java view. This particular view shows Java RAD information for the selected component in the Classes pane.

When you click a Properties, Methods, or Events tab, the corresponding view only displays information for public data not inherited from other member functions. In such views, both the Browser Access Filters pop-up menu and the Show Inherited checkbox are grayed out, indicating that you cannot change these settings. Figure 15.2, Figure 15.3, and Figure 15.4 show the resulting Browser window.
The Properties view, shown in Figure 15.2, displays information about the properties of the selected component in the Classes pane. This view is divided into the Properties pane and the Implementation pane.

The Properties pane lists the properties for the selected component. When you select a property in this list, the implementation for that property is shown in the Implementation pane. To learn how to create new properties, see "New Property Window" on page 564.
The Implementation pane is similar to the Source pane. This pane displays the selected property's implementation in your source code. The source code in the pane is fully editable. The top of the pane shows the path to the file containing the implementation.
The Methods view, shown in Figure 15.3, displays information about the methods of the selected component in the Classes pane. This tab view is divided into the Methods pane and the Implementation pane.

The Methods pane lists the methods for the selected component. When you select a method in this list, the implementation for that method is shown in the Implementation pane. To learn how to create new methods, see "New Method Window" on page 566.
The Implementation pane is similar to the Source pane. This pane displays the selected method's implementation in your source code. The source code in the pane is fully editable. The top of the pane shows the path to the file containing the implementation.
The Events view, shown in Figure 15.4, displays information about the events of the selected component in the Classes pane. This tab view is divided into the Event Sets pane and the Events pane.
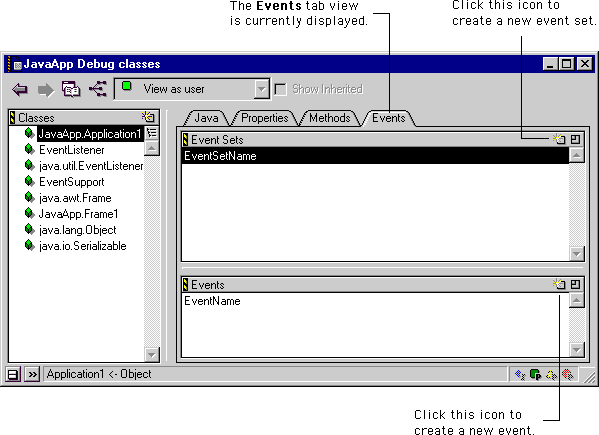
The Event Sets pane lists groupings of events for the selected component. The Events pane shows the individual events for a selected event set. To learn how to create new event sets, see "New Event Set Window" on page 569. To learn how to create new events, refer to "New Event Window" on page 577.
The New Property window helps you create a new property for a selected component in the Browser window. To display this window, make sure that the Browser window is frontmost, then choose New Property from the Browser menu. Alternatively, click the new item icon ( ), as shown in Figure 15.2 on page 561. The
 New Property command changes slightly, based on the framework you use to develop your code. For example, when developing a Java RAD project, the command changes to New Bean Property.
The New Property window is shown in Figure 15.5. This window consists of the following parts:
If you wish, you can enter in this field a required package for the property type.
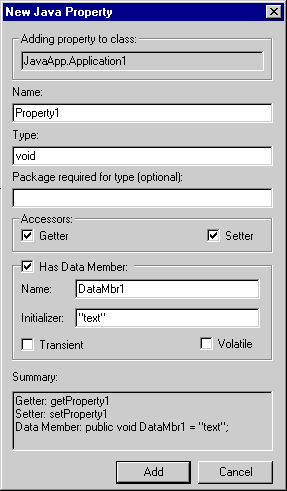
These checkboxes determine the accessor characteristics for the property.
The New Method window helps you create a new method for a selected component in the Browser window. To display this window, make sure that the Browser window is frontmost, then choose New Method from the Browser menu. Alternatively, click the new item icon ( ), as shown in Figure 15.3 on page 562. The
 New Method command changes slightly, based on the framework you use to develop your code. For example, when developing a Java RAD project, the command changes to New Bean Method.
The New Method window is shown in Figure 15.6. This window consists of the following parts:

The New Event Set window helps you create a new event set for a selected component in the Browser window. To display this window, make sure that the Browser window is frontmost, then choose New Event Set from the Browser menu. Alternatively, click the new item icon ( ), as shown in Figure 15.4 on page 563. The
 New Event Set command changes slightly, based on the framework you use to develop your code. For example, when developing a Java RAD project, the command changes to New Bean Event Set. The New Event Set window is shown in Figure 15.7.
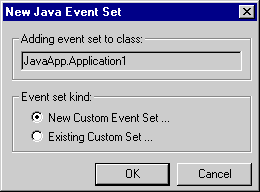
This window lets you specify the type of event set you want to create. There are two possibilities:
When you enable this option and click OK, a wizard opens to help you create a custom event set. See "New Event Set wizard" on page 571 for more information.
When you enable this option and click OK, the Existing Event Set window, shown in Figure 15.8, displays. Select from the list the event set you wish to add and click Add. This existing event set is then added to the selected component in the Browser window.

The New Event Set Window contains an option to create a New Custom Event Set. When you enable this option and click OK, the New Event Set wizard displays.
The wizard includes the following navigation buttons:
1. Choose a name and location for the new event set.
2. Specify a base class and a list of implementations.
3. Assign the new event set to the project's build targets.
To use the New Event Set wizard, follow these steps:
1. Choose a name and location for the new event set.
This section of the wizard, shown in Figure 15.9, lets you specify the name and location of the new event set, as well as the modifiers for the set.
This section includes the following parts:

This pop-up menu lets you specify the type of event set:
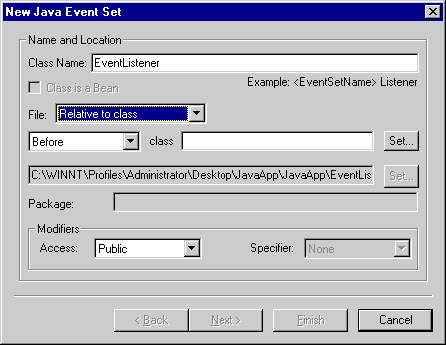
If you choose the Relative to class option, the class field and the pop-up menu beside it become enabled, as shown in Figure 15.10. In the class field, type the name of the class you want to relate to the event set. Alternatively, click Set next to the class field, select a class in the window that opens, and then click Select. Next, use the pop-up menu to place the event set event set Before, After, or Inside the specified class.
If you wish, you can enter in this field a package for the event set. This field is not available if you choose the Relative to class option from the File pop-up menu.
2. Specify a base class and a list of implementations.
This section of the wizard, shown in Figure 15.11, lets you specify the base class and implementations for the new event set.

This section includes the following parts:
3. Assign the new event set to the project's build targets.
This section of the wizard, shown in Figure 15.12, lets you assign the event set to particular build targets within the active project.
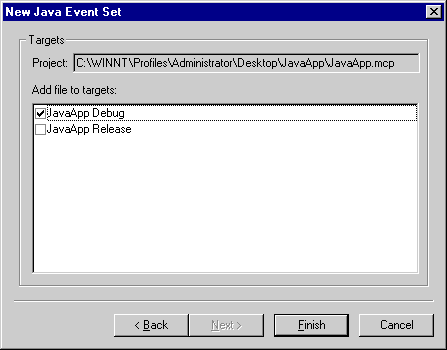
To assign the event set to a specific build target, enable the checkbox next to the build target's name in the Add file to targets list. For example, in Figure 15.12, the new event set is assigned to the JavaApp Debug build target, and it is not assigned to JavaApp Release.
The New Event window helps you create a new event for a selected event set in the Browser window. To display this window, make sure that the Browser window is frontmost and that an event set is selected, then choose New Event from the Browser menu. Alternatively, click the icon described in the Events pane, shown in Figure 15.4 on page 563. The New Event command changes slightly, based on the framework you use to develop your code. For example, when developing a Java RAD project, the command changes to New Bean Event.
The New Event Set window is shown in Figure 15.13. This window consists of the following parts:
If desired, enter exception-handling information (throws) in this field.

If you wish, you can enter in this field a required package for the event.
Enable the Synchronized checkbox to modify the event accordingly.


